<>
Showing posts with label Tips dan Trik. Show all posts

26 December 2015

Cara berbagi file tanpa flashdisk, tetapi melalui Homegroup (Jaringan LAN/WIFI) di windows 7 hingga windows 10

Assalamualaikum wr.wb

Oke sobat EPG.. di akhir tahun ini, saya bakalan share mengenai Cara berbagi file tanpa flashdisk, tetapi melalui Homegroup (Jaringan LAN/WIFI). Oke, sebelumnya yang perlu sobat ketahui, cara ini sangatlah efektif dan efisien. Mengapa? Ya iyalah, dengan adanya homegroup ini, kita tidak perlu repot-repot untuk membeli flashdisk berukuran 16gb atau yang besar2 ukurannya, dan juga apabila agan ingin berbagi file dengan ukuran diatas 4gb, anda tidak perlu memformat flashdisk anda dengan cara merubahnya dari FAT32 ke NTFS, jika anda bingung akan segera saya posting, apa perbedaan FAT32 dan NTFS pada suatu flashdisk.

Oke, pada tutorial kali ini saya akan membaginya menjadi 2 bagian (tetapi harus dikerjakan secara urut ya sob, mulai dari pengaturan pada laptop/PC yang pertama, dalam hal ini Server dan pengaturan pada laptop Client, Nah.. apa itu Server dan Client ? Jadi, Server adalah laptop/PC yang berfungsi sebagai penyedia layanan homegroup, yakni sebagai pengirim file kepada laptop /PC client. Nah.. client disini adalah laptop/PC yang berfungsi untuk menerima file yang dikirim oleh server. Gimana sob? mudah dimengerti bukan? Untuk lebih jelasnya.. sobat ikuti tutorial yang saya berikan dibawah ini yaakk..!

Pengaturan homegroup pada laptop/PC Server

1) Tentunya, untuk melakukan tutorial ini, anda harus mempunyai 2 laptop, laptop 1 sebagai Server, yakni laptop/PC yang digunakan untuk membagi/mengirim file ke laptop/PC Client. Nah, Client disini adalah laptop sebagai pemerima file yang dikirim oleh laptop/PC seperti yang sudah saya jelaskan diatas tadi..;.

2) Oke, cara yang kedua adalah sobat masuk ke Control Panel > Network and Internet> Homegroup
Jika sudah, maka akan tampil jendela windows seperti ini 

3) Lalu, klik create a homegroup, lalu akan muncul beberapa kotak pilihan berisi mana aja yang ingin anda tampilkan saat berbagi, yakni berupa folder meliputi document,pictures,music,videos,printers. Pilih sesuka hati anda mana yang akan dicentang.

4) Jika sudah, maka akan loading sebentar

5) Jika sudah, maka akan keluar jendela windows seperti ini, yakni berisi password dari komputer server (yakni yang sedang kita bahas), ke komputer client (yang nantinya akan kita bahas setelah ini) untuk dikonfirmasi. Gimana sob? masih ingin lanut? Yuk!!


Perlu diketahui ya sob, sebelum kita lanjut, tutorial di atas adalah tutorial untuk laptop/PC server (seperti yang sudah saya jelaskan tadi mengenai client dan server), bertindak sebagai pengirim file, jadi sekarang ini, kita akan melanjutkan tutorial pengaturan homegroup di laptop/PC client. Gimana sob, dah ngerti belom? dibaca lagi sampe paham ya!!! Oke klo udah, kita lanjut skrg !

Pengaturan homegroup pada laptop/PC Client

1) Oke, setelah setting homegroup di laptop/PC server.. sekarang sobat tinggal meng-copy password yang diberikan oleh server sebagai penyedia itu tadi ke laptop/PC Client, yakni laptop/PC yang bertugas menerima file dari server. Cara pengaturannya sama persis dengan tutorial pada laptop/PC server, yakni skrg sobat buka ke Control Panel > Network and Internet> Homegroup. Maka akan keluar tampilan seperti ini :


2) Oke.. lalu klik Join Now, kemudian Next, maka akan keluar tampilan seperti ini, dan pilih mana aja yang ingin digunakan untuk berbagi dengan server.Jika sudah, klik next


3) Maka akan keluar tampilan seperti ini :


4) Nah, sekarang agan masukkan tuh password yang agan terima dari server tadi, maka tinggal agan tulis tuh.. Bila krg jelas, agan bisa lihat gambar dibawah ini :


5) Maka tunggu sebentar ya sob, dan selamat sobat berhasil mengikuti totorial Cara berbagi file tanpa flashdisk, tetapi melalui Homegroup (Jaringan LAN/WIFI) di windows 7 hingga windows 10 ini.


6) Jadi, sekarang jikalau agan pingin trasnfer file, nggak perlu lewat flashdisk sob.. tinggal copy aja ke menu homegroup pada my computer seperti ini nih.. Tinggal copy aja ya sob.. pilih tuh mau ditaruh dimana, sebenarnya sih ditaruh di music,pictures atau yang lainnya itu sama aja sob.. cuma beda "nama" hehe..


Oke, sekian dulu ya postingan saya mengenai Cara berbagi file tanpa flashdisk, tetapi melalui Homegroup (Jaringan LAN/WIFI) di windows 7 hingga windows 10  ini. Selamat Tahun Baru 2016 yaa..!!

Wassalamualaikum wr.wb

Regard,


Arva Athallah Susanto

30 August 2014

How to fix E: Can't mound sdcard easily ! Simple and Absolutely WORK


Hi all, today i will share to you about How to fix E: Can't mount sdcard easily ! WORK for all device 100%, yeah.. some people get this problem when they try to flash zip from sd card with cwm, and then they found a problem like E: Can't mound sdcard, to fix this, most of them try to fix this problem with formatting sd card from android, and also try to format it with PC (like formatting Flashdisk manually), BUT !! This trick still not work, Okay, I found how to fix the problem and my trick was very easily, JUST FORMAT WITH SD FORMATTER to fix this problem :V


OK, i will tell you about how to fix this problem
Now, follow my step :)

1) Download the app from : Click Here and Install
2) Then, enter your android to your pc/laptop with usb cable
3) And SD formatter will automatically appear when your sd card was entered to your pc
4) And then click format !!
5) PROBLEM SOLVED !!
6) ENJOY AND TRY TO INSTALL ZIP FROM SD CARD WITH CWM...!!

Just this who can i tell, i hope this can useful for you guys

Regard,
Arva Athallah :)

28 February 2014

100 macam tombol kombinasi keyboard (HOTKEY)


Hai sobat EPG, kali ini saya akan posting tentang 100 macam tombol kombinasi keyboard (HOTKEY) , Sebelumnya.. sobat harus mengenal Apa itu Hotkey ? Hotkey adalah kombinasi tombol di keyboard standar windows untuk melakukan perintah tertentu semacam tulisan tebal dengan ctrl+b dan sebagainya. Nah gimana? Apa sobat sudah paham apa itu hotkey,, oke berikut macam-macam hotkey yang dapat kalian ketahui :


1. CTRL+C (Copy)
2. CTRL+X (Cut)
3. CTRL+V (Paste)
4. CTRL+Z (Undo)
5. DELETE (Delete)SHIFT+DELETE (Delete the selected item permanently without placing the item in the Recycle Bin)
6. CTRL+SHIFT while dragging an item (Create a shortcut to the selected item)
7. F2 key (Rename the selected item)
8. CTRL+RIGHT ARROW (Move the insertion point to the beginning of the next word)
9. CTRL+LEFT ARROW (Move the insertion point to the beginning of the previous word)
10. CTRL+DOWN ARROW (Move the insertion point to the beginning of the next paragraph)
11. CTRL+UP ARROW (Move the insertion point to the beginning of the previous paragraph)
12. CTRL+SHIFT with any of the arrow keys (Highlight a block of text)
13. CTRL+A (Select all)
14. F3 key (Search for a file or a folder)
15. ALT+ENTER (View the properties for the selected item)
16. ALT+F4 (Close the active item, or quit the active program)
17. ALT+ENTER (Display the properties of the selected object)
18. ALT+SPACEBAR (Open the shortcut menu for the active window)
19. CTRL+F4 (Close the active document in programs that enable you to have multiple documents open simultaneously)
20. ALT+TAB (Switch between the open items)
21. ALT+ESC (Cycle through items in the order that they had been opened)
22. F6 key (Cycle through the screen elements in a window or on the desktop)
23. F4 key (Display the Address bar list in My Computer or Windows Explorer)
24. SHIFT+F10 (Display the shortcut menu for the selected item)
25. ALT+SPACEBAR (Display the System menu for the active window)
26. CTRL+ESC (Display the Start menu)
27. ALT+Underlined letter in a menu name (Display the corresponding menu)
28. F10 key (Activate the menu bar in the active program)
29. RIGHT ARROW (Open the next menu to the right, or open a submenu)
30. LEFT ARROW (Open the next menu to the left, or close a submenu)
31. F5 key (Update the active window)
32. BACKSPACE (View the folder one level up in My Computer or Windows Explorer)
33. ESC (Cancel the current task)
34. SHIFT when you insert a CD-ROM into the CDROM drive (Prevent the CD-ROM from automatically playing)
35. CTRL+TAB (Move forward through the tabs)
36. CTRL+SHIFT+TAB (Move backward through the tabs)
37. TAB (Move forward through the options)
38. SHIFT+TAB (Move backward through the options)
39. ALT+Underlined letter (Perform the corresponding command or select the corresponding option)
40. ENTER (Perform the command for the active option or button)
41. SPACEBAR (Select or clear the check box if the active option is a check box)
42. Arrow keys (Select a button if the active option is a group of option buttons)
43. F1 key (Display Help)
44. F4 key (Display the items in the active list)
45. BACKSPACE (Open a folder one level up if a folder is selected in the
46. Windows Logo (Display or hide the Start menu)
47. Windows Logo+BREAK (Display the System Properties dialog box)
48. Windows Logo+D (Display the desktop)
49. Windows Logo+M (Minimize all of the windows)
50. Windows Logo+SHIFT+M (Restore the minimized windows)
51. Windows Logo+E (Open My Computer)
52. Windows Logo+F (Search for a file or a folder)
53. CTRL+Windows Logo+F (Search for computers)
54. Windows Logo+F1 (Display Windows Help)
55. Windows Logo+ L (Lock the keyboard)
56. Windows Logo+R (Open the Run dialog box)
57. Windows Logo+U (Open Utility Manager) Accessibility Keyboard Shortcuts
58. Right SHIFT for eight seconds (Switch FilterKeys either on or off)
59. Left ALT+left SHIFT+PRINT SCREEN (Switch High Contrast either on or off)
60. Left ALT+left SHIFT+NUM LOCK (Switch the MouseKeys either on or off)
61. SHIFT five times (Switch the StickyKeys either on or off)
62. NUM LOCK for five seconds (Switch the ToggleKeys either on or off)
63. Windows Logo +U (Open Utility Manager)
64. END (Display the bottom of the active window)
65. HOME (Display the top of the active window)
66. NUM LOCK+Asterisk sign (*) (Display all of the subfolders that are under the selected folder)
67. NUM LOCK+Plus sign (+) (Display the contents of the selected folder)
68. NUM LOCK+Minus sign (-) (Collapse the selected folder)
69. LEFT ARROW (Collapse the current selection if it is expanded, or select the parent folder)
70. RIGHT ARROW (Display the current selection if it is collapsed, or select the first subfolder)
71. RIGHT ARROW (Move to the right or to the beginning of the next line)
72. LEFT ARROW (Move to the left or to the end of the previous line)
73. UP ARROW (Move up one row)
74. DOWN ARROW (Move down one row)
75. PAGE UP (Move up one screen at a time)
76. PAGE DOWN (Move down one screen at a time)
77. HOME (Move to the beginning of the line)
78. END (Move to the end of the line)
79. CTRL+HOME (Move to the first character)
80. CTRL+END (Move to the last character)
81. SPACEBAR (Switch between Enlarged and Normal mode when a character is selected)
82. CTRL+O (Open a saved console)
83. CTRL+N (Open a new console)
84. CTRL+S (Save the open console)
85. CTRL+M (Add or remove a console item)
86. CTRL+W (Open a new window)
87. F5 key (Update the content of all console windows)
88. ALT+SPACEBAR (Display the MMC window menu)
89. ALT+F4 (Close the console)
90. ALT+A (Display the Action menu)
91. ALT+V (Display the View menu)
92. ALT+F (Display the File menu)
93. ALT+O (Display the Favorites menu)
94. MMC Console Window Keyboard Shortcuts
95. CTRL+P (Print the current page or active pane)
96. ALT+Minus sign (-) (Display the window menu for the active console window)
97. SHIFT+F10 (Display the Action shortcut menu for the selected item)
98. F1 key (Open the Help topic, if any, for the selected item)
99. F5 key (Update the content of all console windows)
100. CTRL+F10 (Maximize the active console window)

Oke Terima Kasih telah membaca postingan kecil saya ini, Semoga bisa bermanfaat bagi kalian sobat :)

Arva,

Cara membobol / membuka password dokumen excel yang diprotect

Hai Sobat EPG, kali ini saya akan posting tentang Cara membobol / membuka dokumen excel yang di protect , Sesuai pengalaman saya sendiri, saya pernah mendapat tugas untuk mengerjakan di Ms Excel, saat itu guru saya memprotect (memberi password) file / dokumen tsb. Berbagai cara telah saya lakukan namun tidak ada yang berhasil, ada cara yang berhasil yakni meng-copy file / dokumen tsb ke blank document baru, tapi cara tersebut salah / kurang tepat, nah lebih tepatnya lagi jika anda membobolnya... Disini saya sedikit sharing bagaimana cara membobol dokumen yang di protect, oke langsung saja,

Berikut contoh gambar file yang di protect oleh guru saya :


Nah, berikut cara mengatasinya :) Cekidot :

1) Pertama-tama, buka file excel anda yang diprotect 
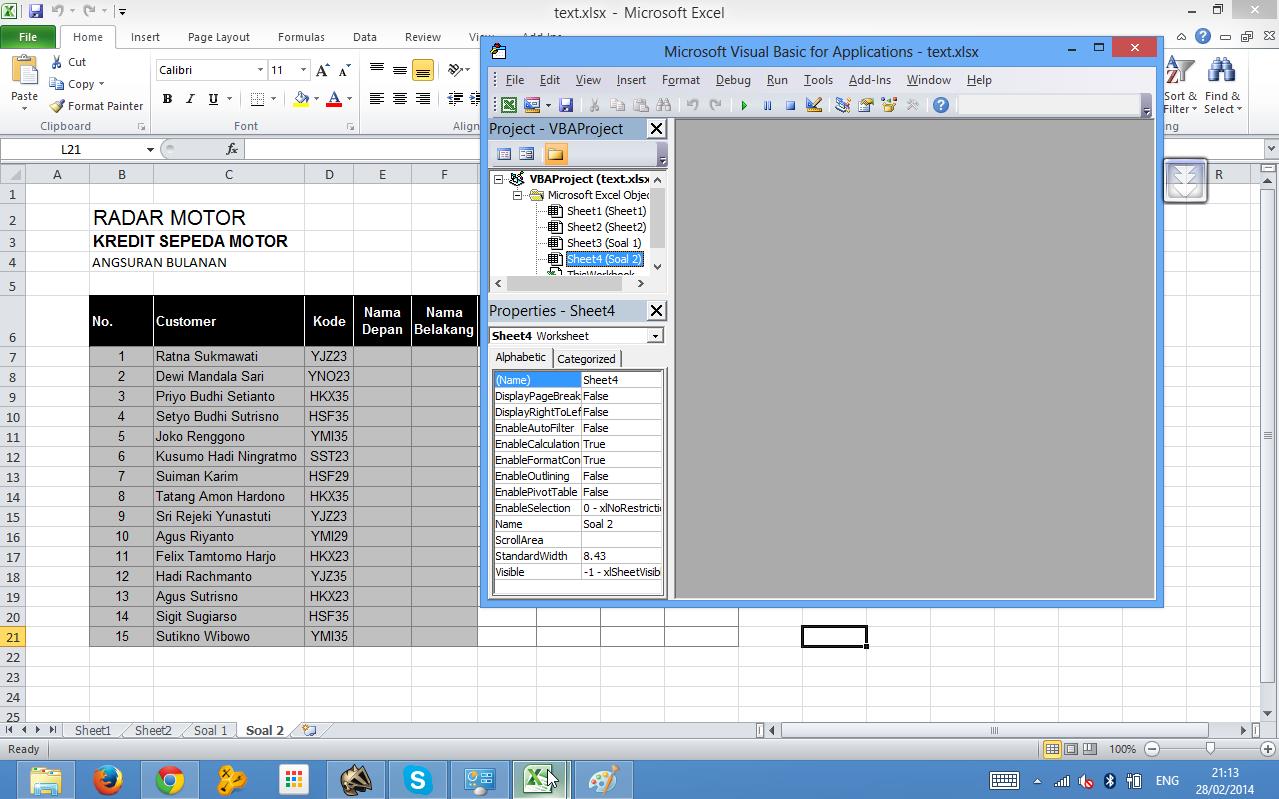
2) Lalu, tekan tombol alt + f11 pada keyboard anda, seperti pada gambar berikut :


3) Bila sudah menekan tombol alt + f11, maka akan muncul visual basic seperti berikut :


4) Lalu klik 2x pada sheet yang ingin dibuka, misal saya tadi menekan tombol alt + f11 di sheet 4, berarti yang anda klik 2x harus sheet 4 tersebut, maka akan nampak seperti berikut jika sudah di klik 2x :


5) Nah, setelah itu anda masukkan kode html dibawah ini :


Public Sub AllInternalPasswords()


        ' Breaks worksheet and workbook structure passwords. Bob McCormick 


        '  probably originator of base code algorithm modified for coverage 
        '  of workbook structure / windows passwords and for multiple passwords
        '
        ' Norman Harker and JE McGimpsey 27-Dec-2002 (Version 1.1)
        ' Modified 2003-Apr-04 by JEM: All msgs to constants, and
        '   eliminate one Exit Sub (Version 1.1.1)
        ' Reveals hashed passwords NOT original passwords
        Const DBLSPACE As String = vbNewLine & vbNewLine
        Const AUTHORS As String = DBLSPACE & vbNewLine & _
                "Adapted from Bob McCormick base code by" & _
                "Norman Harker and JE McGimpsey"
        Const HEADER As String = "AllInternalPasswords User Message"
        Const VERSION As String = DBLSPACE & "Version 1.1.1 2003-Apr-04"
        Const REPBACK As String = DBLSPACE & "Please report failure " & _
                "to the microsoft.public.excel.programming newsgroup."
        Const ALLCLEAR As String = DBLSPACE & "The workbook should " & _
                "now be free of all password protection, so make sure you:" & _
                DBLSPACE & "SAVE IT NOW!" & DBLSPACE & "and also" & _
                DBLSPACE & "BACKUP!, BACKUP!!, BACKUP!!!" & _
                DBLSPACE & "Also, remember that the password was " & _
                "put there for a reason. Don't stuff up crucial formulas " & _
                "or data." & DBLSPACE & "Access and use of some data " & _
                "may be an offense. If in doubt, don't."
        Const MSGNOPWORDS1 As String = "There were no passwords on " & _
                "sheets, or workbook structure or windows." & AUTHORS & VERSION
        Const MSGNOPWORDS2 As String = "There was no protection to " & _
                "workbook structure or windows." & DBLSPACE & _
                "Proceeding to unprotect sheets." & AUTHORS & VERSION
        Const MSGTAKETIME As String = "After pressing OK button this " & _
                "will take some time." & DBLSPACE & "Amount of time " & _
                "depends on how many different passwords, the " & _
                "passwords, and your computer's specification." & DBLSPACE & _
                "Just be patient! Make me a coffee!" & AUTHORS & VERSION
        Const MSGPWORDFOUND1 As String = "You had a Worksheet " & _
                "Structure or Windows Password set." & DBLSPACE & _
                "The password found was: " & DBLSPACE & "$$" & DBLSPACE & _
                "Note it down for potential future use in other workbooks by " & _
                "the same person who set this password." & DBLSPACE & _
                "Now to check and clear other passwords." & AUTHORS & VERSION
        Const MSGPWORDFOUND2 As String = "You had a Worksheet " & _
                "password set." & DBLSPACE & "The password found was: " & _
                DBLSPACE & "$$" & DBLSPACE & "Note it down for potential " & _
                "future use in other workbooks by same person who " & _
                "set this password." & DBLSPACE & "Now to check and clear " & _
                "other passwords." & AUTHORS & VERSION
        Const MSGONLYONE As String = "Only structure / windows " & _
                 "protected with the password that was just found." & _
                 ALLCLEAR & AUTHORS & VERSION & REPBACK
        Dim w1 As Worksheet, w2 As Worksheet
        Dim i As Integer, j As Integer, k As Integer, l As Integer
        Dim m As Integer, n As Integer, i1 As Integer, i2 As Integer
        Dim i3 As Integer, i4 As Integer, i5 As Integer, i6 As Integer
        Dim PWord1 As String
        Dim ShTag As Boolean, WinTag As Boolean
        
        Application.ScreenUpdating = False
        With ActiveWorkbook
            WinTag = .ProtectStructure Or .ProtectWindows
        End With
        ShTag = False
        For Each w1 In Worksheets
                ShTag = ShTag Or w1.ProtectContents
        Next w1
        If Not ShTag And Not WinTag Then
            MsgBox MSGNOPWORDS1, vbInformation, HEADER
            Exit Sub
        End If
        MsgBox MSGTAKETIME, vbInformation, HEADER
        If Not WinTag Then
            MsgBox MSGNOPWORDS2, vbInformation, HEADER
        Else
          On Error Resume Next
          Do      'dummy do loop
            For i = 65 To 66: For j = 65 To 66: For k = 65 To 66
            For l = 65 To 66: For m = 65 To 66: For i1 = 65 To 66
            For i2 = 65 To 66: For i3 = 65 To 66: For i4 = 65 To 66
            For i5 = 65 To 66: For i6 = 65 To 66: For n = 32 To 126
            With ActiveWorkbook
              .Unprotect Chr(i) & Chr(j) & Chr(k) & _
                 Chr(l) & Chr(m) & Chr(i1) & Chr(i2) & _
                 Chr(i3) & Chr(i4) & Chr(i5) & Chr(i6) & Chr(n)
              If .ProtectStructure = False And _
              .ProtectWindows = False Then
                  PWord1 = Chr(i) & Chr(j) & Chr(k) & Chr(l) & _
                    Chr(m) & Chr(i1) & Chr(i2) & Chr(i3) & _
                    Chr(i4) & Chr(i5) & Chr(i6) & Chr(n)
                  MsgBox Application.Substitute(MSGPWORDFOUND1, _
                        "$$", PWord1), vbInformation, HEADER
                  Exit Do  'Bypass all for...nexts
              End If
            End With
            Next: Next: Next: Next: Next: Next
            Next: Next: Next: Next: Next: Next
          Loop Until True
          On Error GoTo 0
        End If
        If WinTag And Not ShTag Then
          MsgBox MSGONLYONE, vbInformation, HEADER
          Exit Sub
        End If
        On Error Resume Next
        For Each w1 In Worksheets
          'Attempt clearance with PWord1
          w1.Unprotect PWord1
        Next w1
        On Error GoTo 0
        ShTag = False
        For Each w1 In Worksheets
          'Checks for all clear ShTag triggered to 1 if not.
          ShTag = ShTag Or w1.ProtectContents
        Next w1
        If ShTag Then
            For Each w1 In Worksheets
              With w1
                If .ProtectContents Then
                  On Error Resume Next
                  Do      'Dummy do loop
                    For i = 65 To 66: For j = 65 To 66: For k = 65 To 66
                    For l = 65 To 66: For m = 65 To 66: For i1 = 65 To 66
                    For i2 = 65 To 66: For i3 = 65 To 66: For i4 = 65 To 66
                    For i5 = 65 To 66: For i6 = 65 To 66: For n = 32 To 126
                    .Unprotect Chr(i) & Chr(j) & Chr(k) & _
                      Chr(l) & Chr(m) & Chr(i1) & Chr(i2) & Chr(i3) & _
                      Chr(i4) & Chr(i5) & Chr(i6) & Chr(n)
                    If Not .ProtectContents Then
                      PWord1 = Chr(i) & Chr(j) & Chr(k) & Chr(l) & _
                        Chr(m) & Chr(i1) & Chr(i2) & Chr(i3) & _
                        Chr(i4) & Chr(i5) & Chr(i6) & Chr(n)
                      MsgBox Application.Substitute(MSGPWORDFOUND2, _
                            "$$", PWord1), vbInformation, HEADER
                      'leverage finding Pword by trying on other sheets
                      For Each w2 In Worksheets
                        w2.Unprotect PWord1
                      Next w2
                      Exit Do  'Bypass all for...nexts
                    End If
                    Next: Next: Next: Next: Next: Next
                    Next: Next: Next: Next: Next: Next
                  Loop Until True
                  On Error GoTo 0
                End If
              End With
            Next w1
        End If
        MsgBox ALLCLEAR & AUTHORS & VERSION & REPBACK, vbInformation, HEADER
    End Sub


Seperti gambar berikut :


5) Lalu klik run, dan lihat hasilnya :)

Sekian dari postingan saya yang cukup panjang ini, apabila ada yang kurang jelas, bisa ditanyakan lewat komentar, Terima kasih.

Arva,

21 February 2014

Cara mengembalikan performa android seperti semula / dioptimalkan dengan Greenify

Hai sobat EPG, kali ini saya akan posting tentang Cara mengembalikan performa android seperti semula/dioptimalkan. Anda ingin mengoptimalkan andrioid anda? Aplikasi yg satu ini sangat berguna jika anda benar2 ingin mengoptimalkan/mengembalikan performa android seperti awal anda beli.. Aplikasi yg satu ini bernama Greenify.


Oke langsung saja, berikut langkah2 menginstal dan mengaktifkan aplikasi tsb :

1. Pastikan hp sudah diroot
2. Download Greenify disini
3. Ekstrak ke sdcard ( didalamnya ada 3 file)
4. Pertama instal Xposed Installer
5. Kemudian instal Greenify donation 2.3 key
6. lalu instal Greenify
7. Buka Xposed Installer, pilih framework  lalu pencet install/update
8. Klik Reboot


Nah, gimana perubahan sebelum dan sesudahnya.. :D

Oke sekian dan Terima Kasih ^^

How to fix Windows Defender turned off by group Policy on Windows 8

Hi, today i will share to you about How to fix Windows Defender turned off by group Policy, there have a easy and simple step to fix your windows defender who was turned off by group police..


Okay..
-First, go to Start Menu and search regedit
-And then, you was in 'Registry Editor'
-Then, go to HKEY_LOCAL_MACHINE\Software\Policies\Microsoft\Windows Defender
-You find the value 'DisableAntiSpyware'
-Right Click and 'Delete Value'
-Finish and your windows defender will turned on again ^_^

Credit :
http://www.howtogeek.com/forum/topic/windows-defender-turned-off-by-group-policy-more-help-please

Thanks, and don't forget to visit EPG's Blog.. I will share all my knowledge to you :D

Regard,

Arva Athallah
Admin...

19 November 2013

Cara login Wifi.id dan kumpulan username Wifi.id by Arva


WIFI.id HACK KEY by ARVAATHALLAH :3 
152331206276                                     
111341140022
142212102262
172411206916
152603200625
111761100070                       
152631200434                                                                        
172103200395                                 
141410101533                                 
111135100161
111135100155
111135100153
111135100152

For my friend in spentigda 8-5:
Khoif
ian
djona
arsa
andi
sandi
fajar
adib
maulana
brian
hari
sobri
zulvian
micko
ridwan

and don't forget to visit http://www.extremeprogamer.blogspot.com

Thanks to:
Nyit-Nyit
CirebonCyber4rt
AllahSWT
Ortu
My Sister
and etc

23 September 2013

Cara menonaktifkan fitur copy paste CTRL+C, CTRL+U, CTRL+A di blog


Hai Sobat EPG kali ini saya akan posting tentang cara menonaktifkan fitur copy paste,tentunya bagi anda yang sangat kesal dengan ulah BLOGGER NEWBIE BANCI SOK SOKAN JADI HACKER, DANCOK WES POKOKKE (Sorry emosi), kali ini saya punya tips dari Sobat BLOGGER lainnya, saya hanya sekedar berbagi tips dan trik nya, Oke langsung saja :

1. Login dulu ke blogger Klik disini
2. Masuk ke template > Edit template
3. Cari kode <body> lalu ganti dengan kode dibawah ini

<body oncontextmenu='return false;' onkeydown='return false;' onmousedown='return false;'>

4. Terakhir save template kamu

Fungsinya :

  • oncontextmenu='return false;' untuk mematikan fungsi klik kanan pada blog anda
  • onkeydown='return false;' untuk mematikan fungsi Ctrl baik itu ctrl+a, ctrl+u, ctrl+c
  • onmousedown='return false;' untuk mematikan fungsi block pada artikel anda

SEKIAN YA !!! 

Download Titanium Backup Pro v6.0.2 apk

Hai sobat EPG kali ini saya akan posting tentang Aplikasi yang satu ini,, yaitu Titanium Backup Pro..

Titanium Backup Pro 6.0.0 Apk - Bagi yang suka gonta ganti rom, pasti sudah tau dong apa gunanya aplikasi ini.  Nah disinilah fungsi dari aplikasi Titanium Backup PRO ini. Versi yang saya share ini merupakan versi PRO atau full version sehingga fitur yang ditawarkannya sangat lengkap. fungsi utama dari aplikasi Titanium Backup PRO, kamu bisa membackup, restore dan membekukan (freeze) data maupun konfigurasi pada Android. Maksudnya fungsi Fungsi freeze disini yaitu dapat memindahkan aplikasi dari memori internal ke SD card, atau bisa juga untuk menghapus aplikasi bawaan ponsel android anda yang dianggap tidak perlu. Aplikasi Titanium Backup ini menurut saya sangat wajib harus pasti ada di ponsel android anda, mengapa ? karena fitur-fitur dari aplikasi Titanium Backup PRO sangat di butuhkan pengguna android, liat aja fitur lengkapnya di bawah. Karena kehebatan aplikasi ini, Titanium Backup PRO masuk dalam jajaran Top Paids & Top Apps.


Screenshoot:


Cara Upgrade OS android Galaxy Young GT S5360 ke OS JellyBean ROM JellyBlast V3


 MOHON DI SEDIAKAN BAHAN BERIKUT SEBELUM UPGRADE , UNTUK MEMPERMUDAH KALIAN..!! DAN BACA INTRUKSI PERLAHAN-LAHAN, KARENA KALO ANDA GAGAL, BUKAN TANGGUNG JAWAB SAYA. SAYA SUDAH MEMBUKTIKANNYA, DAN HASIL NYA BAIK. OK.. 
Untuk MELAKUKAN UPGRADE ROM, HARUS sudah Galaxy YOUNG harus Sudah ROOT (klo belum tau klik tulisan ini)
Bahan-Bahan
1. hp android Samsung Galaxy young GT-S5360 (selain galaxy young tidak akan bisa)
2.  JELLY BLAST V3  => DI SINI  123.28 MB
3. QUICKBOOT => (cari di playstore ada)
4. GT_S5360_CWM => DISINI 
5. sikap tenang & mental jangan terburu buru pahami dan baca satu per satu

ada font tambahan biar makin keren
ok kita mulai 

pastikan uda ke download semua file diatas 

1. Letakan JELLYBLASTV3.Signed.ZIP dan GT_S5360_CWM.ZIP di SDCARD [Tidak DI FOLDER]
2. Pastikan KERNEL Masih BAWAAN PABRIK [ kalo anda masih Menggunakan Ginggerbread 2.3.6  , Berarti KERNEL anda masih PABRIK , aman Lanjut ke langkah di bawah
3. Kalo yang SDCARD nya di PARTISI , Hapus dulu APLKASI tersebut , Misal : a2SD atau 2SD dan memFORMAT PASTISI nya. namun kalo Tidak di PARTISI, abaikan saja. lanjut kebawah
4. Setelah Di pastikan Siap, Install QUICKBOOT , Lalu JALANKAN.

5. Pilih RECOVERY, Lalu tunggu sampai Muncul tampilan " Android System Recovery" 
6. Lalu Pilih Apply Update From SDCARD [ gunakan Tombol VOLUME kebawah atau  keatas ]
7.  Lalu Pilih GT_S5360_CWM.ZIP , Lalu kalo sudah ,

8. Setelah itu maka akan keluar TAMPILAN " CLOCKWORKMOD RECOVERY "
9. Kalo Langkah di atas sudah terlihat, Berlanjut lagi, anda pilih WIPE DATA/RESET YES DELETE ALL

10. kalo sudah , berikutnya Pilih WIPE CHACE PARTITION, YES DELETE ALL

11. Nah kalo sudah Semua WIPE DATA dan WIPE CHACHE, Anda Pilih INSTALL ZIP FROM SD

12. lalu " CHOOSE ZIP From SDCARD"
13. Anda Arah Kan ke bawah sobat, cari Yang namanya " JELLYBLASTV3.SIGNED.ZIP"

14. Kalo sudah Di Pilih Biarkan PROSES BELANGSUNG(memang agak lama) , kalo sudah PILIH REBOOT
15. Proses REBOOT membutuhkan Waktu SEDIKIT LAMA, JAdi Ketika Muncul Logo Samsung GALAXY YOUNG dan SAMSUNG, LALU HITAM.. MOHON BIARKAN, sekitar 5 MENIT . JANGAN DI PAKSA di MATIKAN..!!! Maka GALAXY YOUNG dengan OPERATING SISTEM TERBARU SIAP DI GUNAKAN.. enjoy.. Mantaps.. hehehe.. :P

kalo kurang jelas ini ada videonya :
 https://www.youtube.com/watch?v=Wtilrl_894A 
OK.. Tambahan Sobat.. Kalo sudah di COUSTOM ROM ini. Anda akan mendapatkan fasilitas OTA
Apa itu OTA atau OVER THE AIR .. OTA adalah fasilitas yang bisanya di sediakan Untuk Tipe smartphone kelas HIGHT yang mana Apabila ada Updatean Operating system Ponsel, maka akan secara otomatis mendownload, dan anda dapat pembaharuan Operating system ponsel. 
Nah.. Coustom ROM ini juga di berikan Fasilitas OTA oleh si pembuat, guna memperbaiki BUG BUG yang timbul. . atau penambahan FITUR. 
Nah.. kemarin saya lupa.. padahal Coustom rom Ini sudah memberikan 3 KALI update OTA.. Saya sudah mencobanya semua..  Kalo sobat mau langsung mencoba nya semua SECARA BERTAHAP.. di persilahkan.. karena saya akan sediakan KE tiga OTA nya.. 
==> OTA PERTAMA  3 SEPTEMBER   4 MB
Lag fix, better pop ups and buttons, fixed black text on popups, stability fix..
==> OTA KEDUA       2 OKTOBER  12 MB

Changelog:

1. Refined and polished status bar:
Roboto clock
Fixed overlapping of Settings button and clear button.
Original JellyBean signal icons.
Improved swipe to clear.
2. Contacts app has hd contact image support.
3. Golden Play music icon and themed music background.
4. More polished and beautiful framework. Added back the original jellybean battery icon.
5. Gallery with lockscreen wallpaper support.(Those who want back the original ICS Gallery can download it under Troubleshooting below...)
6. An awesome messaging app:
Fixed white on white text bug.
No auto sms to mms conversion.
Theme support.
Added original ICS emoticons.
7.Built in ADBLOCKER.
8.Improved phone app.

==> OTA KE TIGA   27 OKTOBER   34 MB

Changelog:

1.Audio Enhancements:

i. BEATS™ audio for Marvellous, crisp sound. ( remember to exclude it from your task killer)
ii. SONY XLOUD™ enhancement for controlling sound distortion in high sound levels.
iii. SRS WOW® HD.
iv. Dolby Digital 3D surround sound.
2. SONY CYBERSHOT™ Camera enhancements: Clearer image even after zoom and larger image size ( 100%). Adapted from Cybershot mod by Rizal Lovins.
3. Real JellyBean version image. ( Check by multiple clicking the Android Version number under Settings/About phone.
4. New wallpapers from CM10, GS3 and JellyBean. ( Thanks to Hmhadi98).
5. New GS3 lockscreen font and animation.
6. New AOKP inspired Status Bar toggles.
7. New bootanimation by Emanula, fixed by Alan.
8. New System App installer, this can be used to install apps directly to System. Useful when you want to replace System apps.
9. New ICS on-off buttons in Settings and framework.
10.Better RAM usage.
11.Fixed alarm bug.
12. Latest Jellybean Youtube and PlayStore.
13. Improved MMS app.
14. Improved Dialer app.

==> OTA EMPAT  12 MB  19 NOVEMBER

Changelog:

1.Smoother framework.
2.Revamped UI.
3.Improved
i.Contacts,
ii.Phone,
iii.MMS,
iv.Music,
v.Memo,
vi.FM Radio.
vii. Clock App.
( Modded from HOLO theme by Alin Marin. Thanks!)
4.Integrated Adrenaline Engine.
5.Loopy Smoothness.
6.Improved boootanimation and boot sound by Ritayan.
7.A much improved hosts file.
8.StatusBar Greper ( available as a separate patch on my xda page-look below ).

OTA LIMA


OTA 5 Pre-Nemesis (3rd February 2013 || Version 3.5 ):
Changelog:

1.Smoother framework.
2.Inbuilt JB Lockscreen.
3.New clock app.
5.All Black on black bugs fixed!!!!
6.Creed parts replaced with Lidroid parts. (Lockscreen menu forced to close)
7.New toggles from CM7 ics theme.
8.Google MDPI boot animation.
9.Fixed default sounds in build.prop

==> JBV3 OTA 5 Pre-Nemesis.signed_.zip   4 MB

trus gimana cara ngistal OTA nya ??
mudah kok ni ada tutor nya 
 1. Pastikan Download OTA di ATAS,. TERSERAH MAU DOWNLOAD yang man.. kalo sudah.. Pindahkan FILE ZIP tersebut ke SD CARD/OTA-UPDATER/DOWNLOAD

2. Kalo sudah di pastikan Di pindahkan. Buka Ke SETTING, pilih paling bawah CHECK FOR UPDATE

3. Kalo muncul, Pemberitahuan Hidupkan WIFI, ya HIDUPkan aja. walawpun Tidak ada Wifi di sekitar anda

4. Menuju CHECK FOR UPDATE LAGI kalo ada pemberitahuan di INGORE aja. kalo tampilan BLANK. tidak ada apa apa. Di Tekan tombol Sebelah HOME, lalu pilih VIEW DOWNLOADS ROM

5. Nah.. Muncul kan Update ROm yang tadi di Pindahkan. silahkan Pilih itu

6. Lalu pilih INSTALL
7. CEKLIST PADA WIPE CHACE AJA. 
8. Lalu Pilih INSTALL. maka UPDATE akan PROSES.
9. setelah selesai, Maka Ponsel Akan REBOOT. dan masuk KE Home SCREEN.. SELAMAT.. Update Sudah SELESAI..